
Installing halo headlights can give your vehicle a unique and stylish look that sets it apart from others on the road. However, many people may be hesitant to install them due to concerns about the difficulty of the process. So, is it hard to install halo headlights?
The answer to this question depends on your level of experience with automotive repairs and electrical wiring. For those who are comfortable working with cars and have some knowledge of wiring, installing halo headlights may be a relatively straightforward process. However, for those who are less experienced, the installation process may be more challenging.
Regardless of your level of expertise, it is important to carefully follow the installation instructions provided by the manufacturer to ensure that the headlights are installed correctly and safely. In the following sections, we will provide more information details about halo headlights and the installation process, as well as tips for ensuring a successful installation.
Key Takeaways
- Installing halo headlights can be challenging for those with less experience with automotive repairs and electrical wiring.
- It is important to follow the manufacturer's instructions carefully to ensure a safe and successful installation.
- Professional installation may be a good option for those who are not comfortable with the installation process.
Understanding Halo Headlights
Halo headlights, also known as angel eyes, are a popular aftermarket modification for cars. They are named after the glowing ring of light that surrounds the headlight bulb. Halo headlights are typically made of LED or CCFL (cold cathode fluorescent lighting) technology. They are available in a wide range of colors and styles, making them a popular choice for car enthusiasts.
They are not only an aesthetic upgrade, but they also offer improved visibility and safety on the road. The bright, white light produced provides better illumination of the road ahead, making it easier to see and avoid potential hazards.
Installing halo headlights can be a challenging task, especially for those who are not experienced with car modifications. However, with the right tools and instructions, it is possible to install halo lights at home. Many manufacturers provide detailed installation instructions and videos to help users with the installation process.
Before installing halos, it is important to ensure that they are compatible with your car's make and model. It is also important to check local laws and regulations to ensure that the installation of aftermarket headlights is legal in your area.
Related Posts:
Materials Needed for Installation
Before starting the installation process, it is important to gather all the necessary materials. The following are the materials needed for installation:
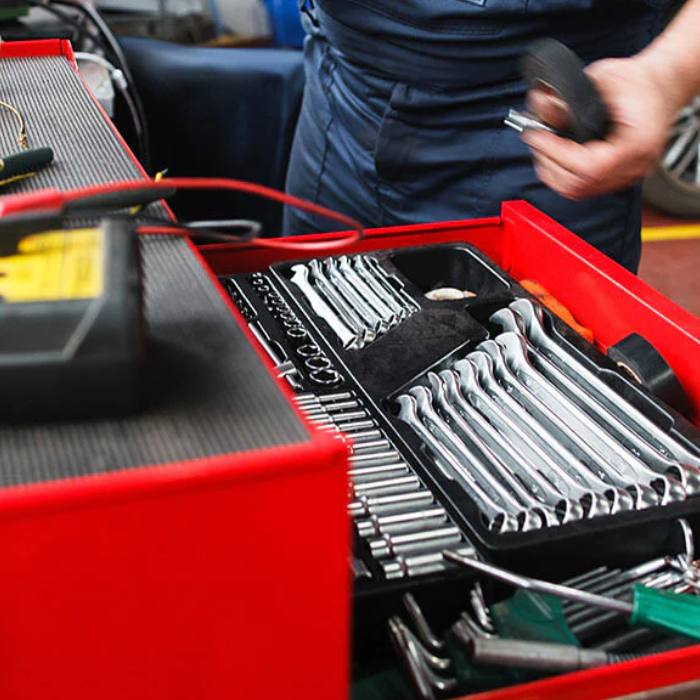
Tools
The installation process requires a few tools to be used. Some of the tools that may be required include a screwdriver, sockets, diagonal cutter, extension, ratchet, combination wrench, torx bit set, and Phillips screwdriver. These tools will be used to remove the old headlights and install and replace the new halo headlights.
Mat
It is advisable to have a mat or a blanket to place on the ground to prevent the headlights or grill from getting scratched or damaged during the installation process.
Connectors
Halo headlights require connectors that are different from those in regular headlights. It is important to ensure that the connectors are compatible with the halo headlights being installed.
Protective Gloves and Goggles
Protective gloves and goggles are essential during the installation process to protect the installer from any potential harm. The gloves will protect the hands from cuts and scrapes, while the goggles will protect the eyes from any debris or flying objects.
Preparation for Installation
Before installing halo headlights, it is important to prepare the necessary tools and equipment. This will make the installation process easier and more efficient. The following are the tools and equipment needed for the installation:
- Protective gloves and goggles
- Mat or blanket
- Screwdriver
- Ratchet
- Extension
- Socket and combination wrench
- Diagonal cutter
- Marker
It is also important to ensure that the installer has a clear understanding of the installation process. They should read the installation manual carefully and watch tutorial videos if available. This will help them to avoid mistakes and ensure that the installation is done correctly.
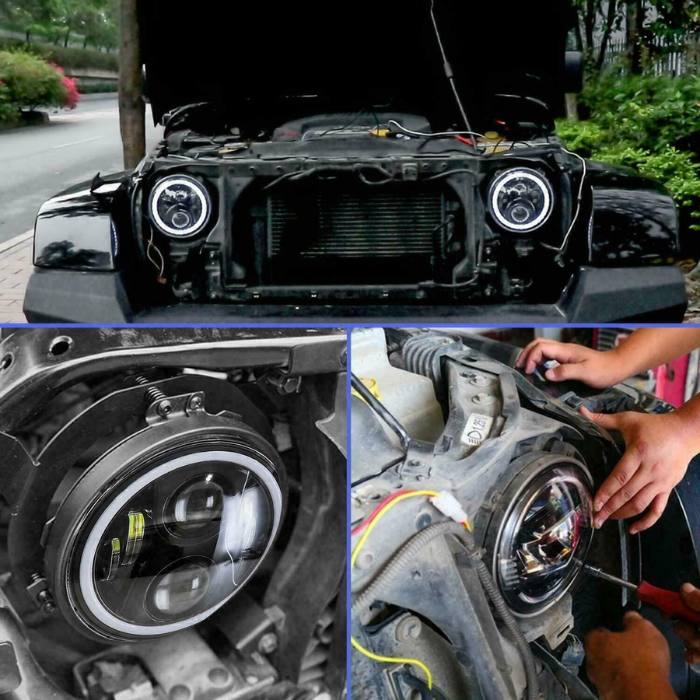
You should also ensure that they have the right headlight assembly for their vehicle. The stock headlights should be removed and replaced with the new halo headlights. T
In some cases, the front bumper and bracket may need to be removed to access the headlight housing. The harness clip should also be removed to disconnect the wiring from the stock headlights.
Once the stock headlight housing have been removed, the new halos can be installed. The mounting bolts should be used to secure the new headlights in place. The corner upper beam should also be adjusted to ensure that the headlights are properly aligned.
Preparing for the installation of halo headlights is an important step that should not be overlooked. By following the installation manual and using the right tools and equipment, the installation process can be done easily and efficiently.
Wiring and Connection
Wiring and connection is one of the most crucial steps. The wiring process should be done with care and precision to ensure that the headlights function properly. Here are a few things to keep in mind when it comes to wiring and connection:
Halo Wires
The halo wires are responsible for powering the halo rings. These wires are usually red and two black wires, and they need to be connected to a power source. The black wire is ground wire, and it needs to be connected to the negative terminal of the battery or the chassis of the vehicle. The red wire is the positive wire, and it needs to be connected to a power source that is controlled by the ignition switch.
Low Beams and High Beams
Halo headlights usually come with separate wires for the low beams and high beams. These wires are usually labeled, and they need to be connected to the corresponding wires on the engine or vehicle's wiring harness. It is important to make sure that the low beam and high beam wires are connected to the correct wires, as this will affect the functionality of the headlights.
Resistor
Some halo headlights come with a resistor that needs to be installed in the wiring harness. The resistor is used to regulate the voltage and prevent the headlights from flickering or dimming. It is important to follow the manufacturer's instructions when installing the resistor, as the process can vary depending on the type of resistor and the wiring harness.
LED Wires
If the headlights also have LED halo rings, there may be additional wires that need to be connected. These wires are usually labeled, and they need to be connected to the corresponding wires on the vehicle's wiring harness. Again, it is important to make sure that the wires are connected correctly to ensure that the LED lights function properly.
Installation Process
Installing halo headlights is not a difficult process, but it does require some technical knowledge and attention to detail. On some models installing halo lights is a direct replacement on others the process involves opening the headlight assembly, pre-fitting the halo rings, running the wires, and testing the lights before finalizing the installation. Here is a step-by-step guide on how to install halo headlights.
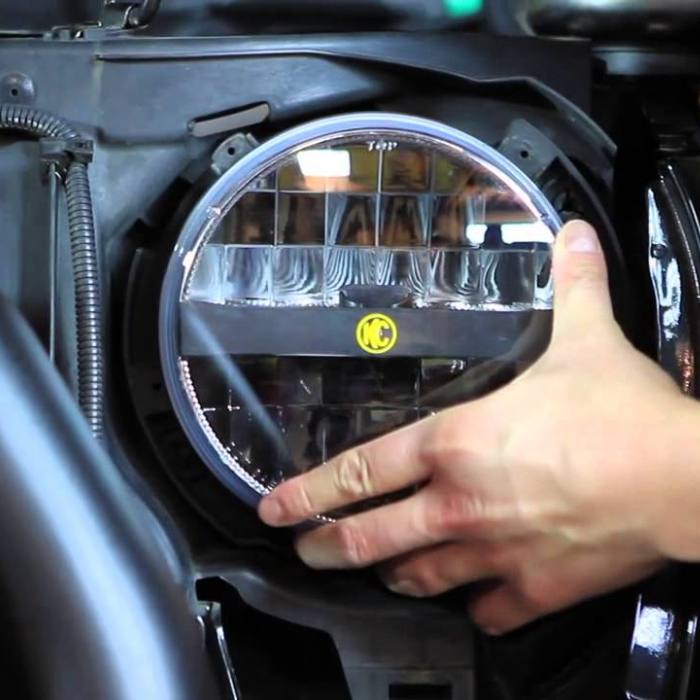
- Open the headlight assembly: To get access to the chrome housing, the headlight assembly needs to be opened. This can be done by removing the screws that secure the lens to the body of the headlight. The number of screws may vary, but most headlights will have two Phillips-head screws. Some headlights may have four screws.
- Pre-fit the halo rings: Once the headlight is open, the halo rings need to be pre-fitted to the housing. The installer should pick the place where they want to run the wires and mark this place with a dot on each side for every halo ring.
- Run the wires: The installer should run the wires through the back of the headlight assembly and connect them to the power source. It is important to ensure that the wires are properly connected and secured to prevent any electrical issues.
- Test the lights: Before finalizing the installation, the installer should test the lights to ensure that they are working properly. This can be done by turning on the headlights and checking the halo rings for any defects or issues.
It is important to note that the installation process may vary depending on the type of halo headlights being installed. For example, the installation process for halo projector headlights may differ from that of regular halos. Additionally, the type of bulbs used may also affect the installation process.
Overall, installation is not a difficult process, but it does require some technical knowledge and attention to detail. By following the steps outlined above, the installer should be able to successfully install halo headlights on their vehicle.
In A Nutshell...
Installing halo headlights can be a DIY project for those with some mechanical skills. However, it is important to have the right tools and follow the manufacturer's instructions carefully. The process involves removing the old headlights, wiring the new ones, and sealing them in place.
It is also important to ensure that the location of the halo headlights complies with local regulations regarding brightness and positioning. In the United States, halo headlights are generally legal as long as they meet certain requirements.
Overall, installing halo headlights on modern vehicles can be a fun and rewarding project for those with some mechanical skills. However, it is important to take the time to do it right and ensure that the headlights are installed safely and legally.
Want to find out what the best brands of halo lights are for your car? Check out our article where we review the top 5 best halo headlight brands on the market today!
Frequently Asked Questions
Can Halo headlights be installed without professional help?
Yes, Halo headlights can be installed without professional help. However, it is important to have basic technical skills and tools to complete the installation process. There are many online tutorials and step-by-step guides available that can help individuals install Halo headlights on their own.
Are there any special tools required to install Halo headlights?
The tools required to install Halo headlights depend on the specific make and model of the car. However, basic tools such as a screwdriver, pliers, and a heat gun are usually required. Some Halo headlight kits may also include special tools that are required for installation.
How long does it take to install Halo headlights?
The time it takes to install Halo headlights varies depending on the make and model of the car and the level of experience of the installer. On average, it can take anywhere from 2-4 hours to complete the installation process.
What are the benefits of installing Halo headlights?
Halo headlights offer several benefits such as improved visibility, better aesthetics, and increased safety. They also consume less power than traditional headlights and can last longer, making them a cost-effective option in the long run.
Are Halo headlights legal to use on the road?
Yes, Halo headlights are legal to use on the road as long as they meet certain requirements. The headlights must be properly aimed and not cause glare to other drivers on the road. It is recommended to check the local laws and regulations before installing Halo headlights.
Can Halo headlights be installed on any type of car?
Halo headlights can be installed on most types of cars, as long as the headlights are compatible with the make and model of the car. It is important to check the compatibility of the headlights before purchasing them to ensure that they are the right fit for the car.
This post may contain affiliate links, which means Anchor Reviews may receive a commission if you purchase through my links, at no extra cost to you. It helps us to keep finding and writing about awesome products for you. Please read thefull disclosure for more information.